Colour formatting - Jenkins Console
Jenkins is the main CI tool used in Software industry. This is the backbone tool for all CI and CD implementation, Build - release and deployment methods. With the help of 100s of plugin available around the jenkins, We can achieve so much of automation around build process including build/deployment pipeline, notification, analysis, pre and post build action etc.
Jenkins has tremendous power to perform great amount of work around the core build process. Many time we write script in pre and post build action to perform many tasks which is becoming very command and necessary for automation.
But the main limitation in running shell script is that it's very difficult to make it more human readable for errors and make it fancy.
Today i am going to cover some steps to make the output of shell script colour formatted.
Jenkins Configuration Steps
- First install following jenkins plugin
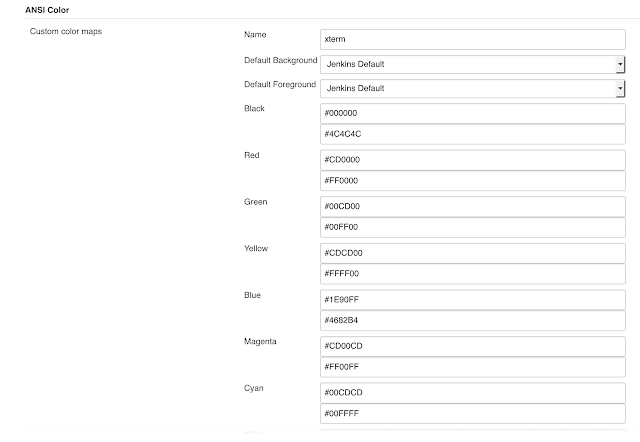
- Go to jenkins configuration page and check the ANSI colour config. You will find or have to setup the xterm like following.
- Edit the desired job via job configuration page and make sure to check the box for "Color ANSI Console Output" like below
Make sure you choose xterm option as you have already configured it in ANSI color configuration.
Script changes
Now, You will have to handle the defining and modifying script to have colour coding configuration.
Example-
This is the code
==============
echo ""
echo "=======Information============"
echo ""
echo "*** Some text here ***"
echo "INFO: Information goes here."
echo ""
echo "Please check document"
echo "---------------------------"
echo ""
echo "=====End of Info==========="
echo ""=============
Output
=======Information============
*** Some text here ***
INFO: Information goes here.
Please check document
---------------------------
=====End of Info===========
Lets make it coloured
Code ->
===============
#!/bin/bash
#Colour Config
RED='\033[0;31m'
NC='\033[0m'
CYAN='\e[36m'
BLUE='\e[34m'
echo -e ""
echo -e "${CYAN}=======Information============"
echo -e ""
echo -e "*** Some text here ***${NC}"
echo -e "${BLUE}INFO: Information goes here.${BLUE}"
echo -e ""
echo -e "${RED}Please check document"
echo -e "---------------------------${NC}"
echo -e ""
echo -e "${CYAN}=====End of Info===========${CYAN}"
echo -e ""
================Output ->
=======Information============
*** Some text here ***
INFO: Information goes here.
Please check document
---------------------------
=====End of Info===========
Explanation -
Following are the colour pattern for different colour
#Colour Config
RED='\033[0;31m' #this is for red
NC='\033[0m' #this is for no colour
CYAN='\e[36m' #this is for cyan colour
BLUE='\e[34m' #this is for blue colour
Above is the initialisation of colour variables which we will be using.
echo -e "${CYAN}=======Information============"
by adding ${CYAN} we are initialising the colour pattern and next text will be of this colour.
echo -e "*** Some text here ***${NC}"
Above ${NC} will stop the colour config and make no colour.
Similarly all other colours are getting initialised and being stopped by ${NC}.
here are some colour combination
# Reset
Color_Off='\033[0m'       # Text Reset

# Regular Colors
Black='\033[0;30m'        # Black
Red='\033[0;31m'          # Red
Green='\033[0;32m'        # Green
Yellow='\033[0;33m'       # Yellow
Blue='\033[0;34m'         # Blue
Purple='\033[0;35m'       # Purple
Cyan='\033[0;36m'         # Cyan
White='\033[0;37m'        # White

# Bold
BBlack='\033[1;30m'       # Black
BRed='\033[1;31m'         # Red
BGreen='\033[1;32m'       # Green
BYellow='\033[1;33m'      # Yellow
BBlue='\033[1;34m'        # Blue
BPurple='\033[1;35m'      # Purple
BCyan='\033[1;36m'        # Cyan
BWhite='\033[1;37m'       # White

# Underline
UBlack='\033[4;30m'       # Black
URed='\033[4;31m'         # Red
UGreen='\033[4;32m'       # Green
UYellow='\033[4;33m'      # Yellow
UBlue='\033[4;34m'        # Blue
UPurple='\033[4;35m'      # Purple
UCyan='\033[4;36m'        # Cyan
UWhite='\033[4;37m'       # White

# Background
On_Black='\033[40m'       # Black
On_Red='\033[41m'         # Red
On_Green='\033[42m'       # Green
On_Yellow='\033[43m'      # Yellow
On_Blue='\033[44m'        # Blue
On_Purple='\033[45m'      # Purple
On_Cyan='\033[46m'        # Cyan
On_White='\033[47m'       # White

# High Intensity
IBlack='\033[0;90m'       # Black
IRed='\033[0;91m'         # Red
IGreen='\033[0;92m'       # Green
IYellow='\033[0;93m'      # Yellow
IBlue='\033[0;94m'        # Blue
IPurple='\033[0;95m'      # Purple
ICyan='\033[0;96m'        # Cyan
IWhite='\033[0;97m'       # White

# Bold High Intensity
BIBlack='\033[1;90m'      # Black
BIRed='\033[1;91m'        # Red
BIGreen='\033[1;92m'      # Green
BIYellow='\033[1;93m'     # Yellow
BIBlue='\033[1;94m'       # Blue
BIPurple='\033[1;95m'     # Purple
BICyan='\033[1;96m'       # Cyan
BIWhite='\033[1;97m'      # White

# High Intensity backgrounds
On_IBlack='\033[0;100m'   # Black
On_IRed='\033[0;101m'     # Red
On_IGreen='\033[0;102m'   # Green
On_IYellow='\033[0;103m'  # Yellow
On_IBlue='\033[0;104m'    # Blue
On_IPurple='\033[0;105m'  # Purple
On_ICyan='\033[0;106m'    # Cyan
On_IWhite='\033[0;107m'   # White
For more colour configuration and patter please refer this


Comments
Post a Comment